
Before you begin
You need the following in place before calling the API:- Account SOPs – Standard operating procedures and account configuration (e.g. provider credentials, portal access) so the agent can perform tasks on your behalf.
- API key – A secret key used to authenticate your requests. You send it as a Bearer token in the
Authorizationheader. - Webhook endpoint – A URL we can call when a task reaches a final state. Your server receives a POST request with the task outcome (completed, completed with issues, or failed) so you can update your records.
Create a task
To create a task, send a POST /tasks request with your API key (as a Bearer token in theAuthorization header), a task type, and either text data or file uploads. The platform creates a task and assigns it to an agent. You do not need to poll for status; when the task finishes, we send a webhook to your configured endpoint with the outcome.
Send the request
Send POST /tasks with your API key, a task type, and either inline text (ResponseOn success (200), the response body is the created task. Store the
data) or file uploads (multipart). The API returns immediately with the created task; the agent runs in the background and you get the final outcome via webhook.- Text data
- Files
Send
type and optional data as JSON. No files required.id if you need to correlate the webhook payload later; you do not need to poll for status.For more details, see the endpoint reference: POST /tasks.
What happens behind the scenes
After you get the task back from the API, a computer agent picks it up and runs it in the background. The agent uses your account’s configured credentials and SOPs to sign in to the payer portal (e.g. Availity), then uses the task data from your request (text or uploaded files) to complete the workflow—e.g. fill forms, check eligibility, or submit claims. It navigates the same screens a human would. You do not need to poll or use the UI; when the agent is done (success, issues, or failure), we send a webhook to your endpoint with the outcome.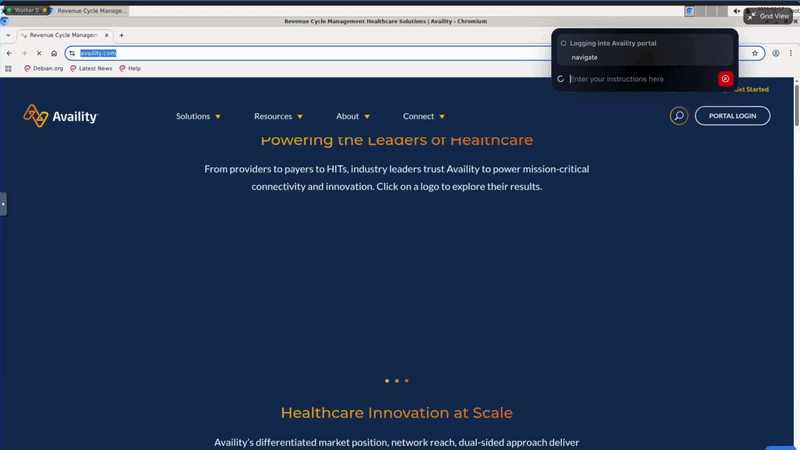
Receive the webhook
When the task reaches a final state, we send a POST request to the webhook URL you configured for your account. The body is an envelope with Respond with a 2xx status so we know the delivery succeeded. If we do not receive 2xx, we may retry. For payload details, retry behavior, and configuration, see Webhooks.
signature (to verify the payload), event ("task_finished"), created_at, and data (the task object). Your server can update your database, notify users, or trigger follow-up workflows—no polling or dashboard checks needed.You will receive one of three statuses in data.status:- completed – The agent finished successfully; the task was completed as intended.
- completed_with_issues – The agent finished but with caveats (e.g. manual follow-up needed). Use
data.notesfor details. - failed – The task did not succeed. The payload includes
data.noteswith error or context for the record.
- completed
- completed with issues
- failed
Next steps
API reference
Explore authentication and other endpoints.
Webhooks
Payload format and configuration for task completion webhooks.